August 2, 2023
How to Screen Record on Windows 11 with Audio

Mike
Screen recording has become an essential tool in today's fast-paced digital world. For professionals, students, gamers, and almost everyone.
Whether you want to record an online meeting, create a tutorial video, or capture your gameplay, screen recording is the way to go.
However, how you actually go about doing this can quickly get technical. Unsurprisingly, many content creators are looking for an easy solution.
In fact, there are two straightforward solutions that can help if you're using Windows 11. One native and one using a third-party recording app that comes with a ton of editing features.
All in real-time.
In this guide, we'll show you how easy it is with a complete step-by-step guide on both methods. We'll also share some tips to help you get the best screen recording experience.
Let's go.
Part 1: Native Screen Recording on Windows 11
Windows 11 comes equipped with the Xbox Game Bar software. Built-in feature that provides versatile screen recording capabilities. While initially developed with gamers in mind, the Xbox Game Bar can be leveraged by anyone. If you want to capture their screen or create video content, the Xbox Game Bar can help.
A step-by-step guide to screen recording on Windows 11
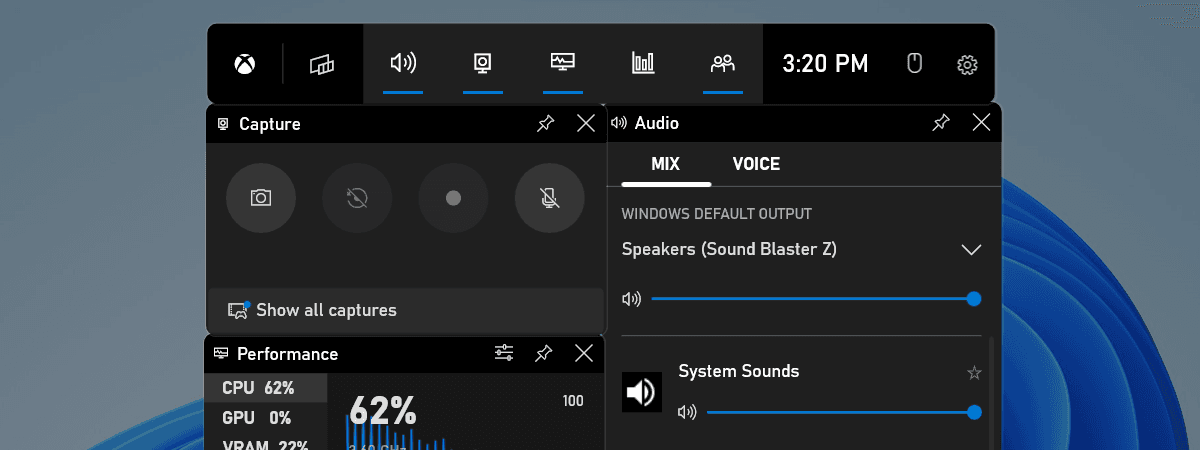
Open the Xbox Game Bar: Press Win+G to activate the Xbox Game Bar. Alternatively, you can search "Xbox Game Bar" in the Windows search bar and open it from there.
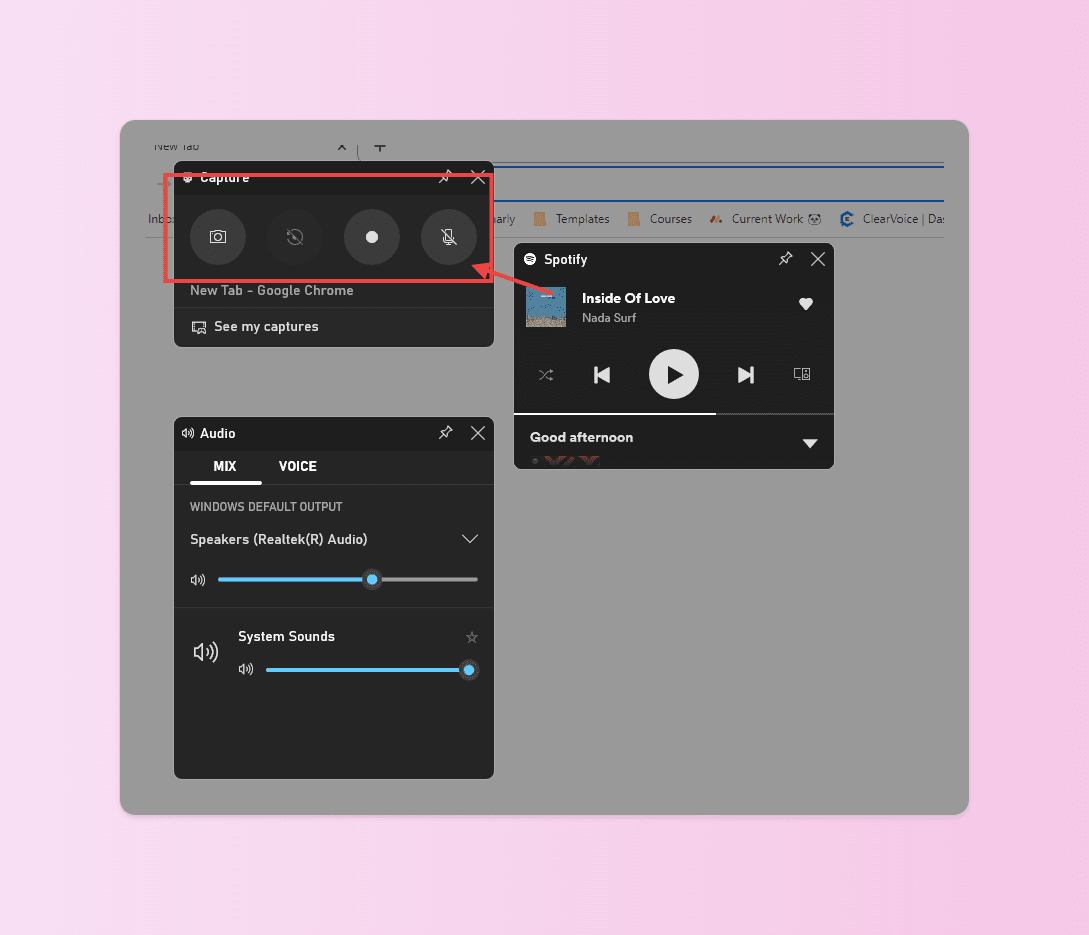
Start Recording: Click the "Capture" widget and hit the "Record" button (a circular icon with a red dot). "Capture" widget isn't visible? Access the recording controls by clicking the "Widgets" menu button and selecting "Capture."
Stop Recording: To stop your recording, either click the "Stop" button (a square icon) in the Capture widget or press Win+Alt+R.
Find and Manage Your Recordings: Recorded videos are in the "Videos\Captures" folder within the "This PC" directory. The Xbox Game Bar also lets you trim your videos directly from the "Recordings" tab within the Capture menu.
Limitations of the built-In Windows 11 screen recording feature
While the Xbox Game Bar provides a useful screen recording solution, it may not cater to everyone's needs. Some limitations include:
Heavy resource usage, which could impact system performance
Lack of support for recording non-gaming applications on specific systems
Limited editing functionalities
A screen recording alternative to the Xbox Game Bar
Find your computer doesn't have the Xbox Game Bar? Looking for an alternative? Don't worry, you have options.
Notably the Windows Snipping tool. Here's how it works.
Hit the Start Menu and search "Snipping Tool"
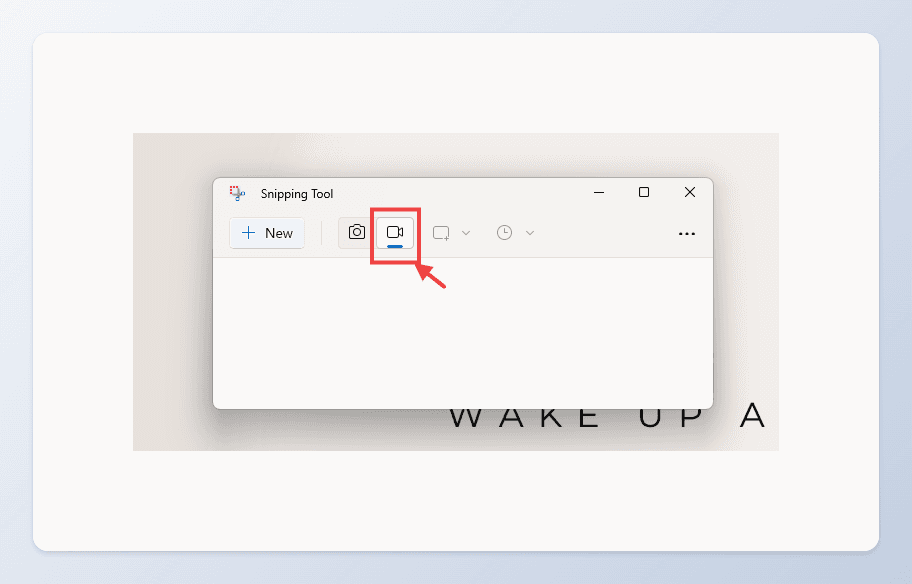
Click the "video" button at the top.
Click "New" and highlight the area of the screen you want to record
At the top of the screen, click the "Start" button

When you're finished recording, simply click "Stop"
Your video screen recording will be saved to your PC's video folder.
Part 2: Tella screen recording on Windows 11
Step #1 - Getting started with Tella.tv
Before you can begin recording your screen using Tella.tv, you'll need to sign up for an account or log in if you've already created one. Visit the Tella.tv website and click on "Get Started" to create an account.
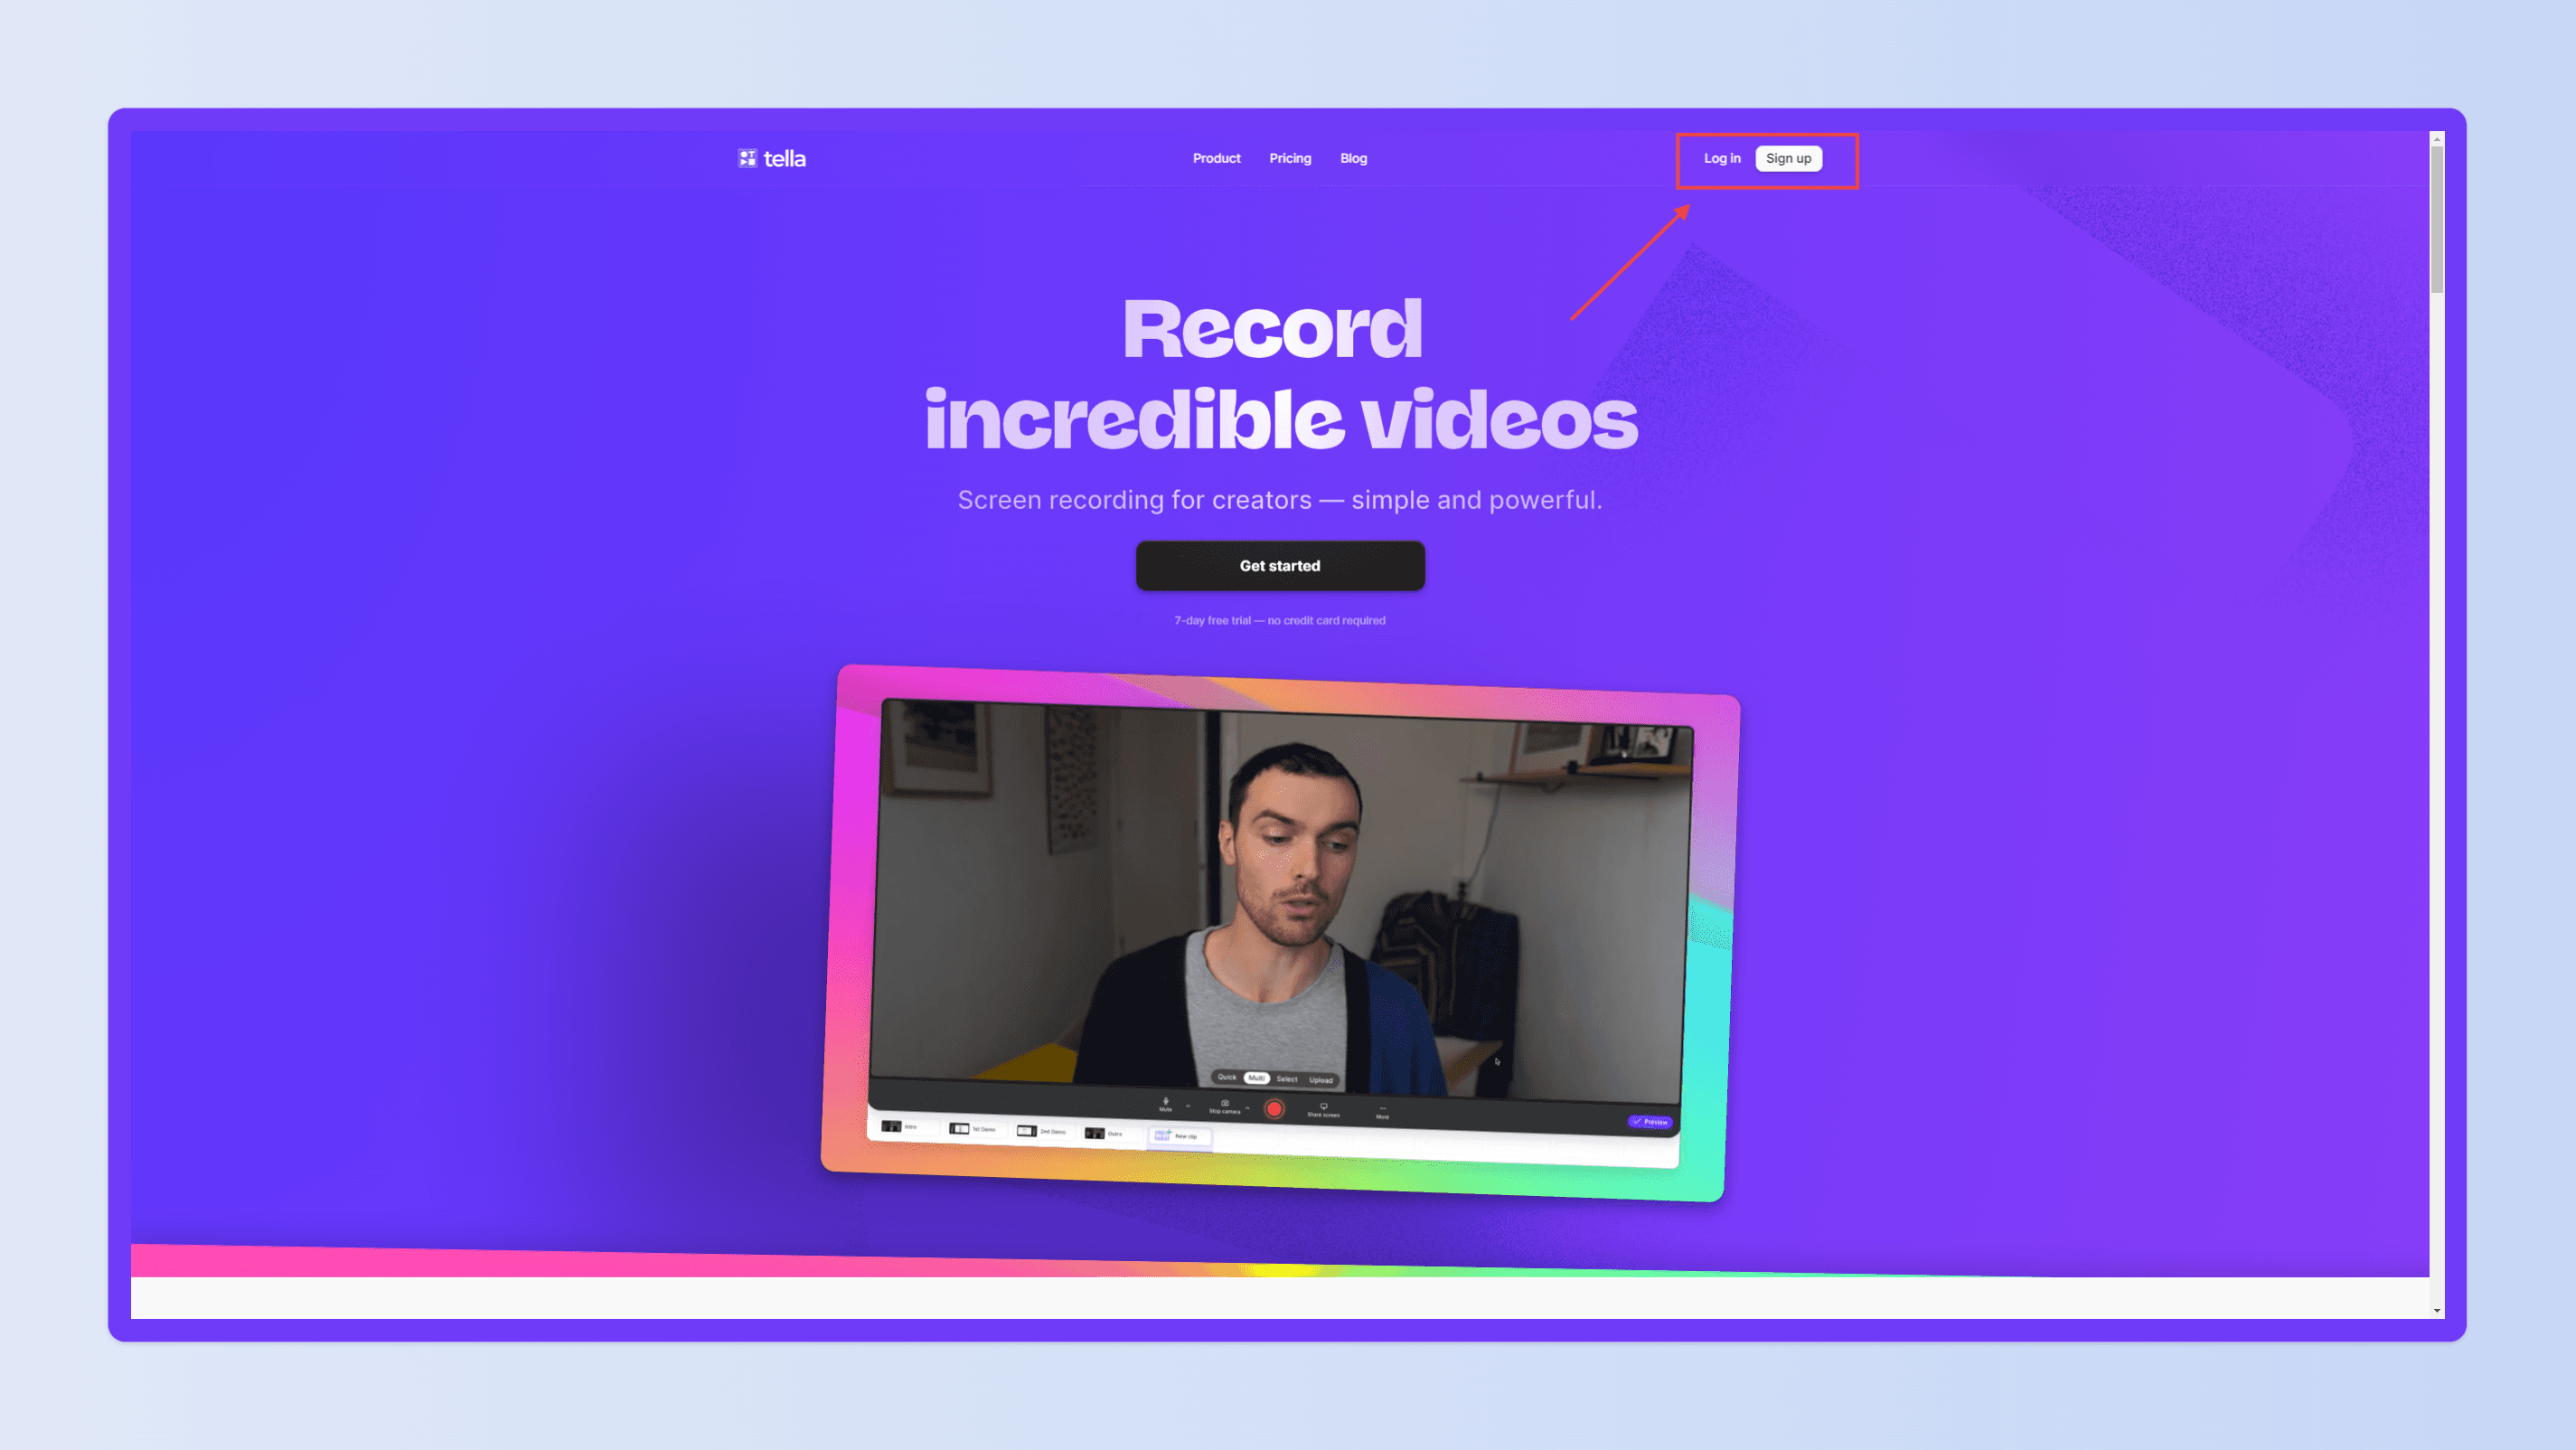
Once you've provided your email address and created a password, you'll be well on your way to start using Tella.tv.
Step #2 - Setting up Tella on Windows 11
Before you start recording, setting up your screen recording settings in Tella.tv is essential. This will help your recorded screen content appear better organized and more professional.
Now, there are several ways to do this.
While there's a dedicated Mac app for recording on Windows 11, you'll need to use the Chrome web extension.
Simply head over to the Chrome store page and add the official extension to your browser.

Next, pin the extension so it's easily accessible.
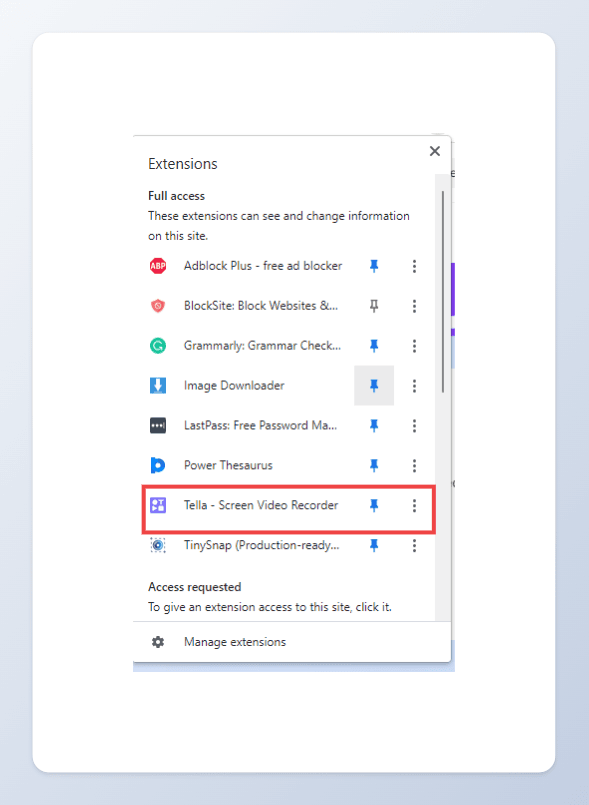
Once pinned, click the extension and sign into your account using the details from Step #1.
Now you're ready to record.
Step #3 - Start recording
Whenever you're ready to record, simply click the Tella extension in the top-right of your Chrome browser.
At the bottom of the pop-up, you'll see three options;
Start Camera
Unmute
Share Screen
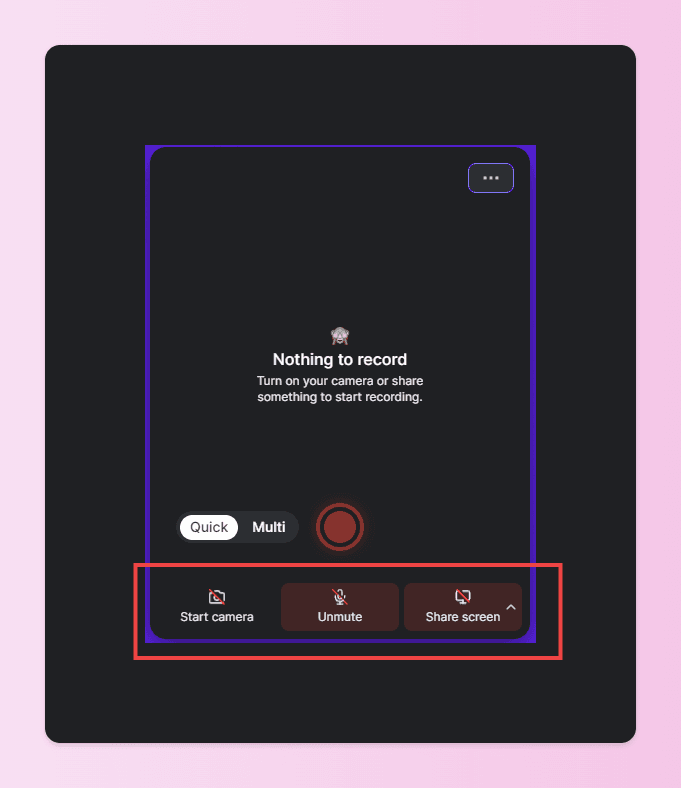
By default, these options are grayed out. However, they're self-explanatory. To share your screen, just click share screen. If you want to add your webcam and microphone streams, you can also enable them. Then, click record.
You can also record a Tella video directly in the browser.
Step #4 - Save your recording
Now you can go about recording your video content. Take as long or as little as you need. Do as many take as you like. Do what you need to do.
When you've finished, stop the recording, and you'll see a new tab open automatically and upload your recording to the Tella servers.
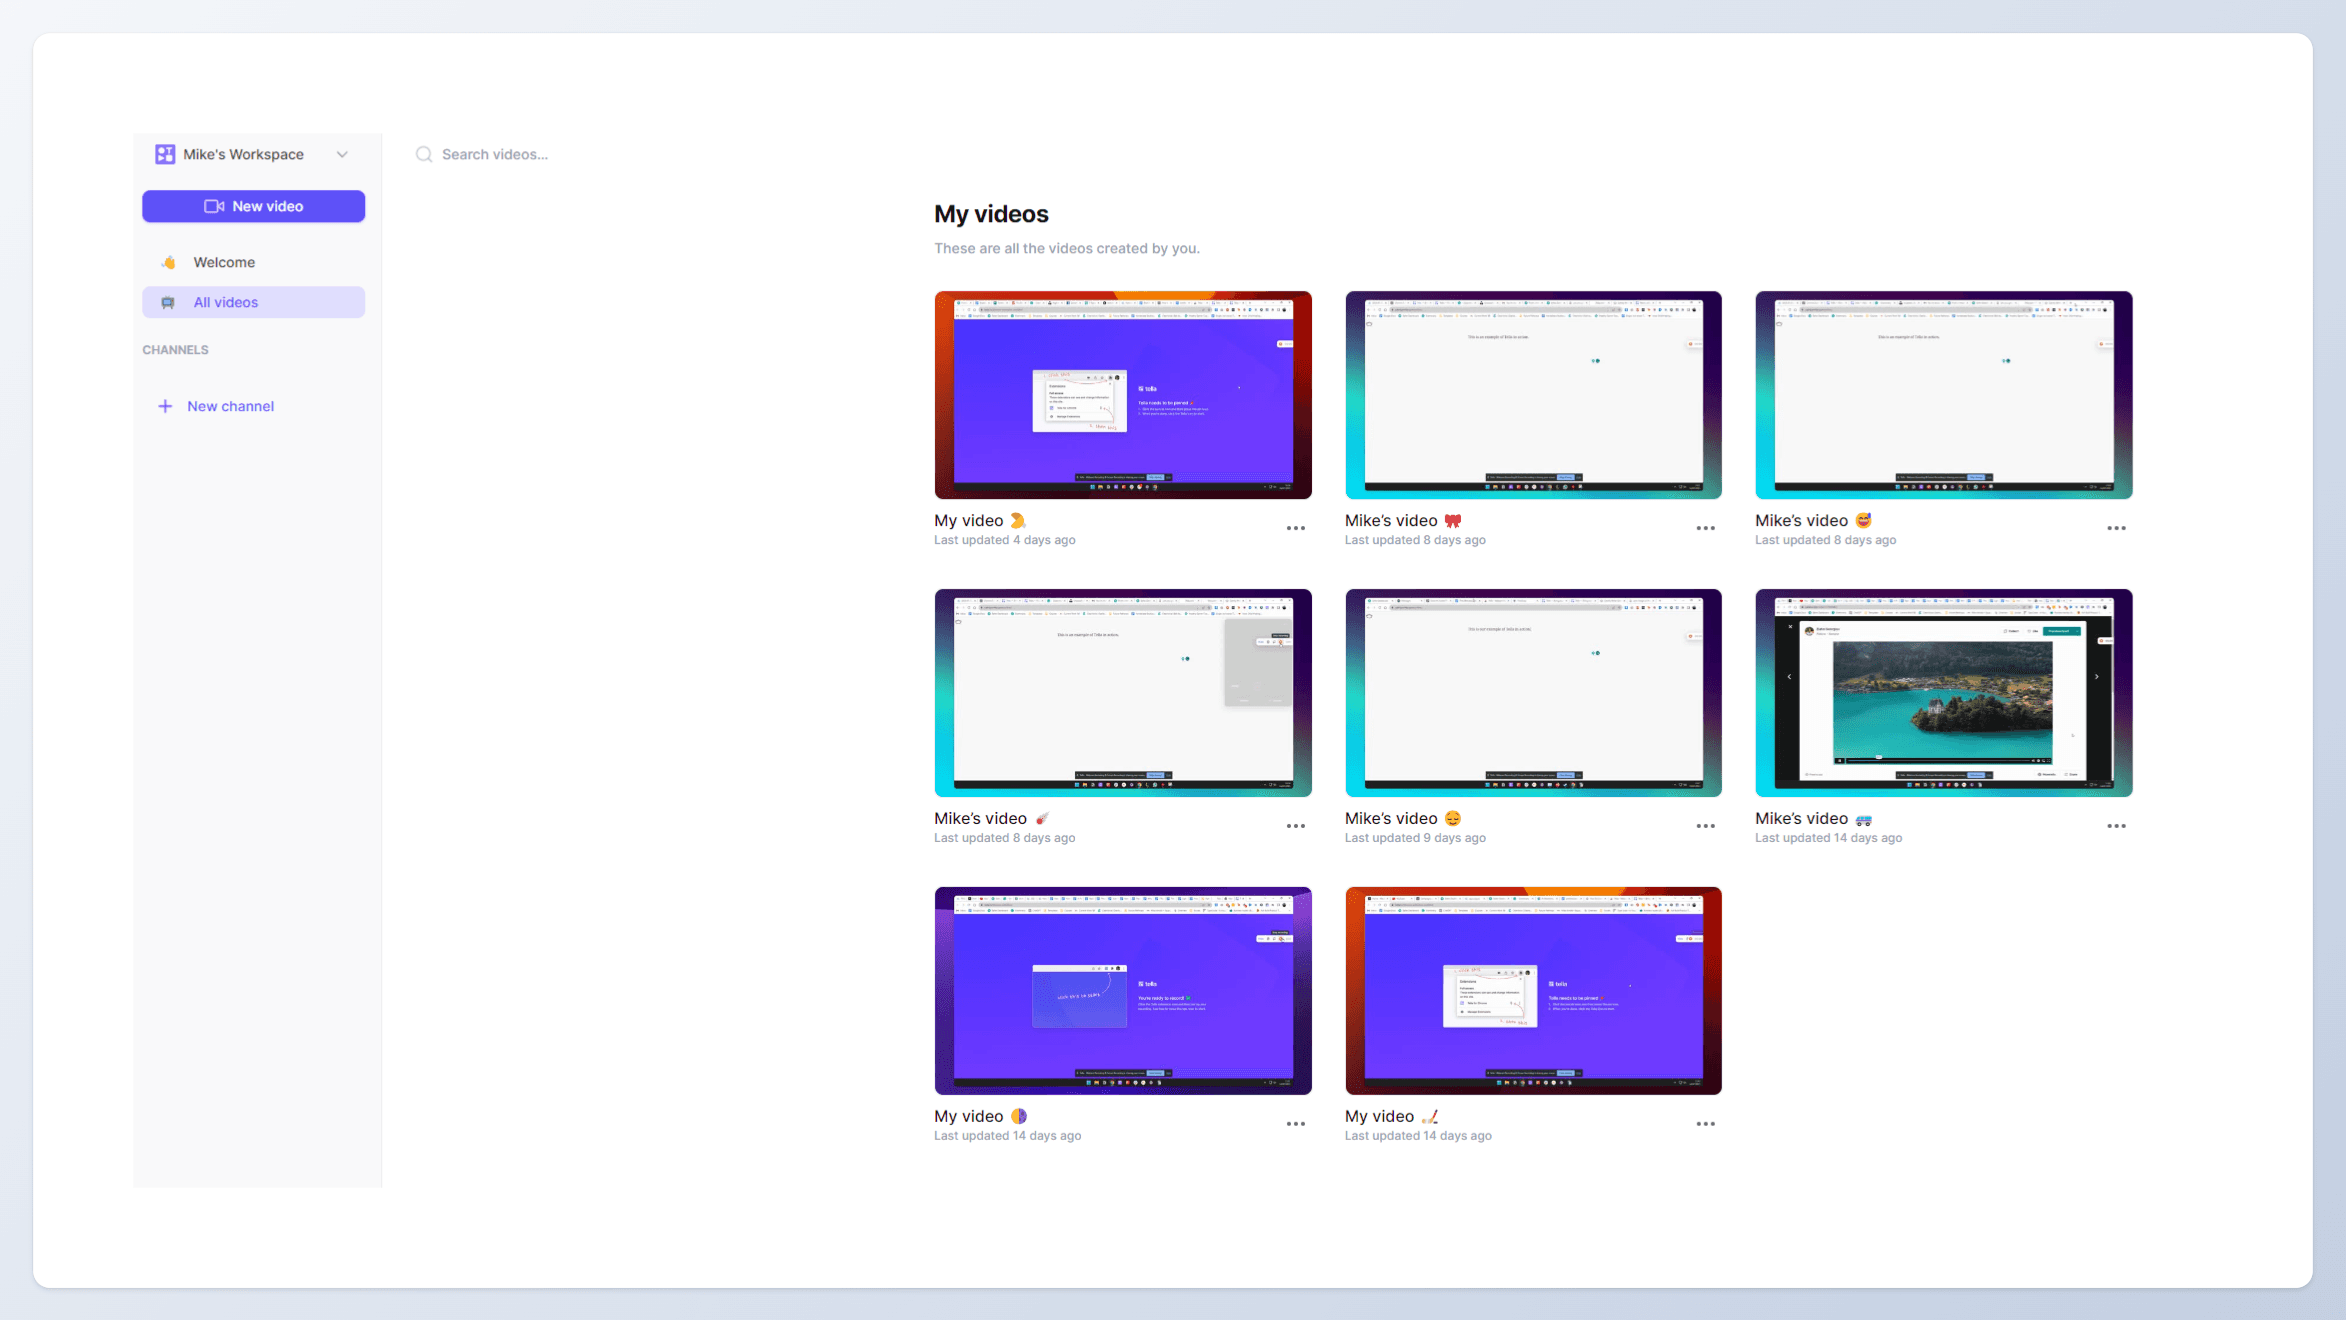
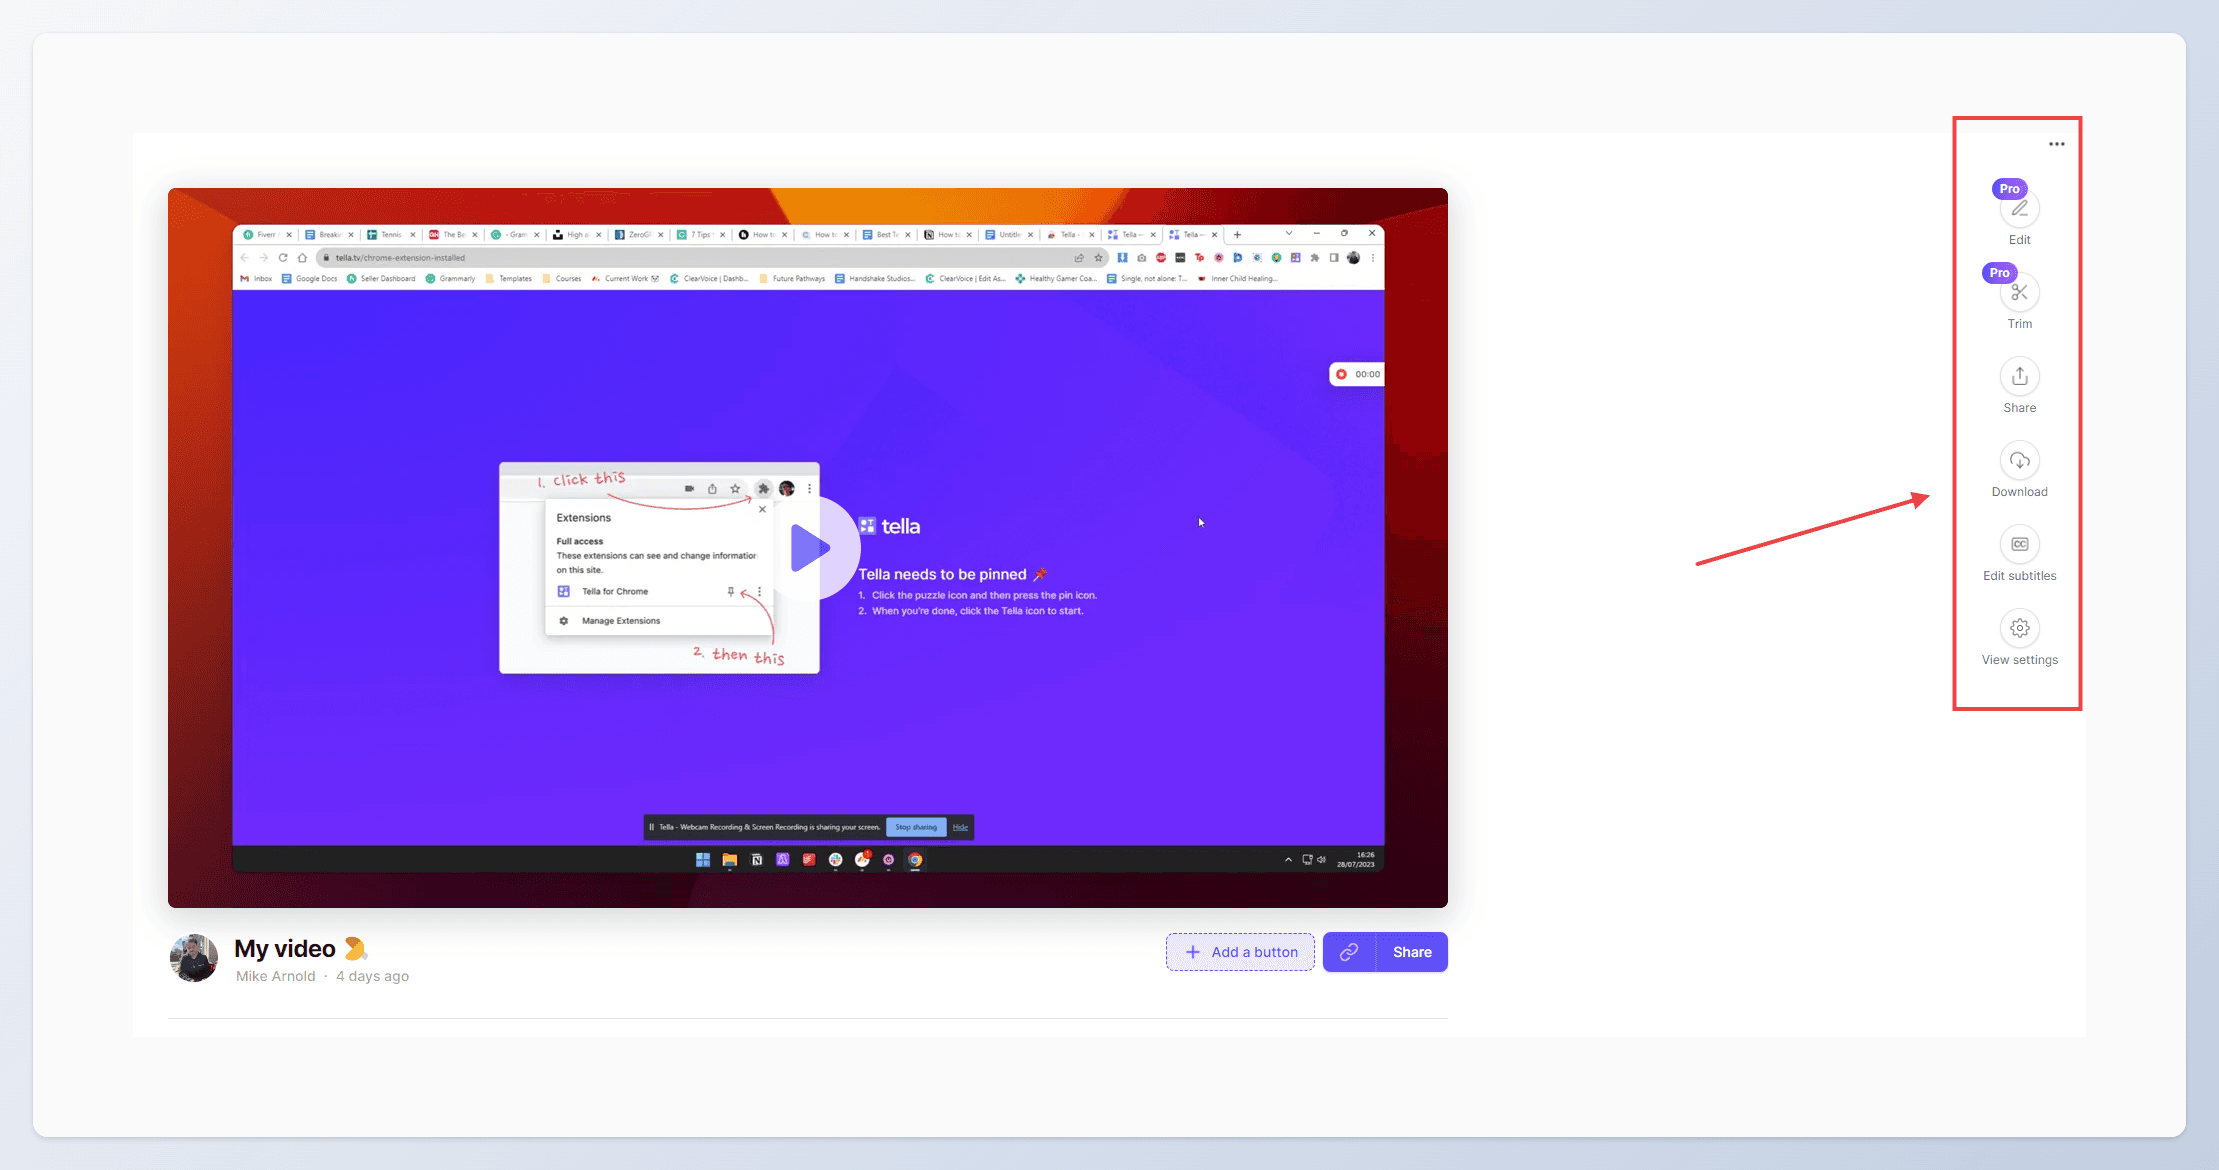
From here, you can download and share your video. You can also access all the editing tools by clicking on a recording.
Step #5 - Edit and tweak your content
If you're happy to download and edit your screen recording content, that's fine. However, Tella has a full suite of tools to make this part of the process easy.
Editing tools included with Tella
Tella.tv offers you various editing tools that can elevate the quality of your video content. Let's explore the functionality of each:
Trim: This tool lets you remove unwanted parts from your video, making it crisp and concise. Perfect for eliminating mistakes or unnecessary sections.
Zoom: The Zoom feature allows you to focus on specific recording areas. This helps highlight details and draw viewer attention to the crucial parts of the video.
ReRecord: Did you make an error during your recording? The ReRecord tool allows you to re-record video segments without starting from scratch.
Background: Personalize your videos by adding a customized backdrop. This feature gives your content a unique and professional look.
Layout: Tella.tv lets you change the screen layout to best suit your presentation style. Choose from several different layout options to customize the look of your video.
Border: Add stylish borders to your videos for an extra aesthetic touch. This can make your content stand out and look more polished and finished.
Mirror Cam: Mirror Cam reflects your screen video horizontally. This is ideal for specific presentation or visualization needs.
Crop Screen: Using the Crop Screen tool, you can eliminate unwanted elements from your recordings for a cleaner look.
Size: Adjust the size of your video to meet your specific needs. This tool offers flexibility in the final sizing of your content.
Edit Subtitles: Improve your video's accessibility by editing auto-generated captions. This ensures clarity and accuracy, helping to improve the viewer's experience. You can also decide to hide the subtitles by default.
With these easy-to-use tools at your fingertips, you can create professional, engaging videos using Tella.tv.
Part 3: Tips for a better screen recording experience with Tella.tv
Now that you know how to screen record using Tella.tv on Windows 11, it's time to explore some tips that will help you improve the quality of your recordings.
1. Optimal setting arrangement
One key aspect of creating a professional-looking screen recording is to have a clean and organized screen. Close any unnecessary tabs, applications, or documents you don't want to be visible during the recording.
Additionally, you might want to silence or turn off notifications. This is so you avoid interruptions during the recording process.
2. Quality of recording
High-quality video recordings look more professional and are generally more visually appealing. In Tella.tv, you can adjust the settings to get the best quality recording for your needs.
To ensure HD quality, select the "HD" option when choosing your recording quality. Also, ensure your computer's display resolution is set to at least 1280x720 pixels.
3. Utilising Tella.tv features
Tella.tv has features that can enhance your screen recording experience. Some of its unique features include:
Editing tools: Edit your recorded video to remove any mistakes or unnecessary sections and add annotations. You can also add effects or transitions to make the video visually engaging.
Collaboration: Invite team members to collaborate on a recording or edit together in real time. This makes it easier to create a cohesive video for your project.
Sharing options: Tella.tv allows you to share your recordings directly with others. This is without the need to go through the hassle of downloading and uploading your video elsewhere.
Screen recording is an invaluable tool in today's digital environment. But, finding the right software is crucial to getting the most out of your screen recordings.
Tella.tv allows Windows 11 users to create clean, organized, and professional recordings. All with a user-friendly interface and practical features.