September 10, 2023
How to Crop a Screenshot on Mac

Mike
Welcome to our easy guide on how to crop screenshots on your Mac. Here, you'll find clear instructions on many tools that help you crop those screenshots just right, with Tella as one of them.
No jargon, no fluff—just simple stuff.
Table of Contents
The native method: Preview App
Keyboard shortcuts for easy cropping
Installing third-party apps
Tips for enhancing screenshot skills
Common issues and troubleshooting
Frequently Asked Questions
Conclusion
The native method: Preview App
Cropping a screenshot doesn't have to be hard. The Preview App, which comes pre-installed on your Mac, makes it easy to do just that.
Follow these steps:
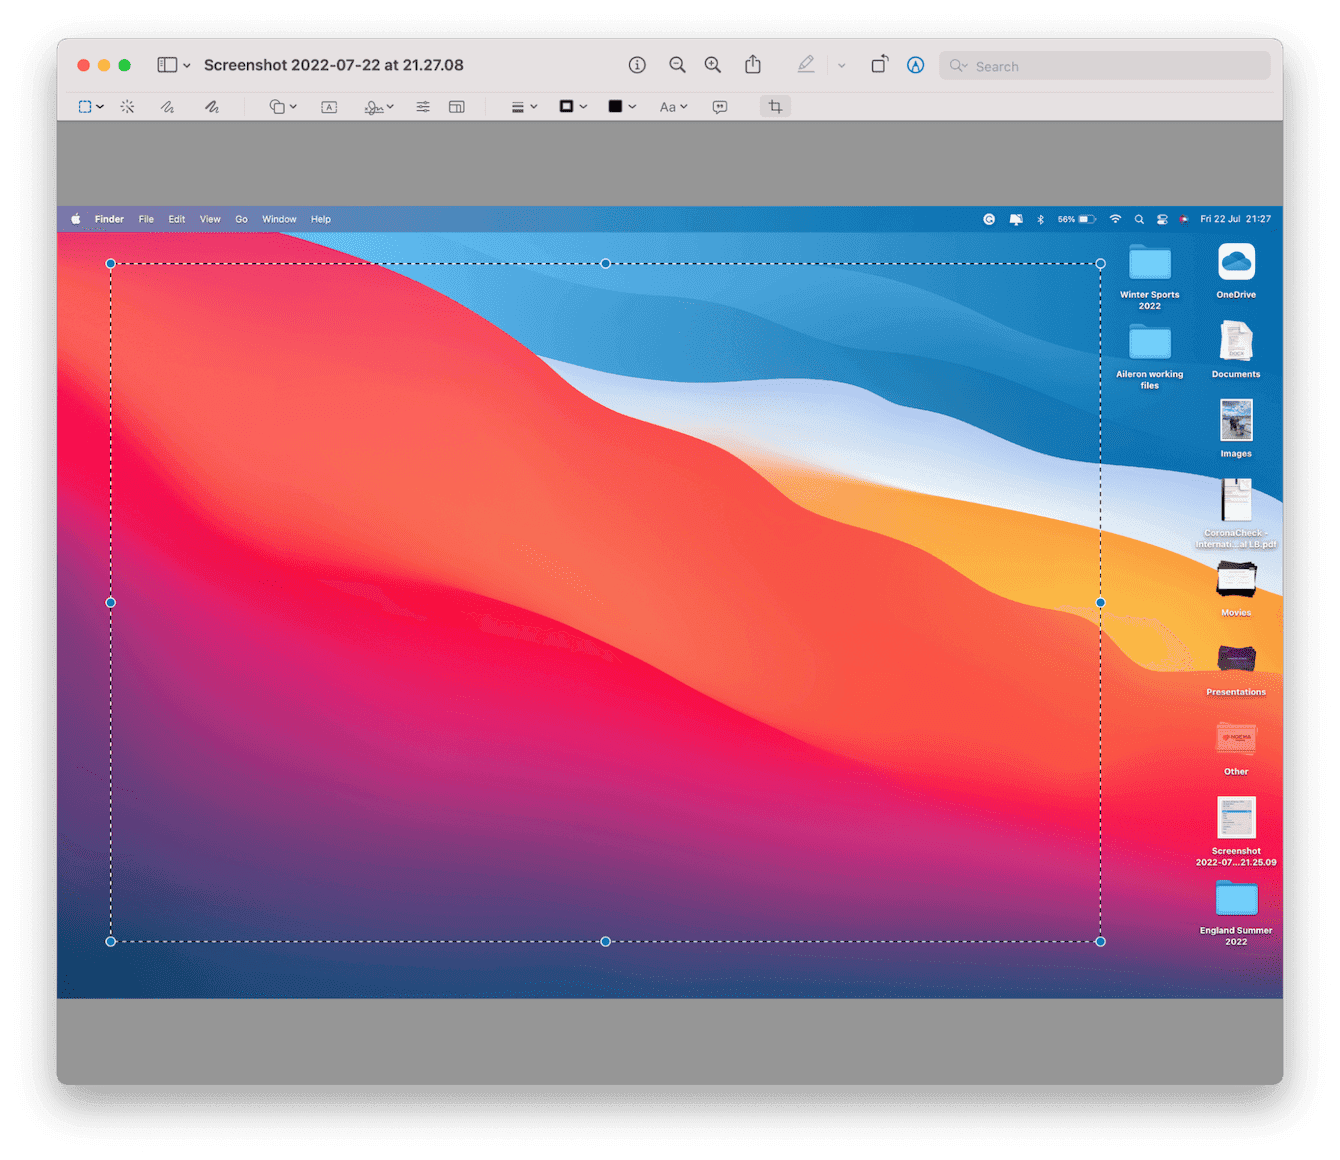
Open your screenshot with the Preview App. Or, select the photo or screenshot you want to edit and open it with the Preview App.
Look for the "Show Markup Toolbar" icon—it has a pencil and ruler on it—and click it.
Select the "Rectangular Selection" tool.
Drag a box around the area you'd like to crop.
Once you've selected the area, go to the menu bar, click "Tools" and then choose "Crop."
Save the cropped image as you usually would.
There you have it: a quick and easy way to crop your screenshot using the Preview App.
Keyboard shortcuts for easy cropping
If you're a fan of working fast and avoiding too many clicks, keyboard shortcuts are a great tool for cropping screenshots on a Mac. Here's how to use them:
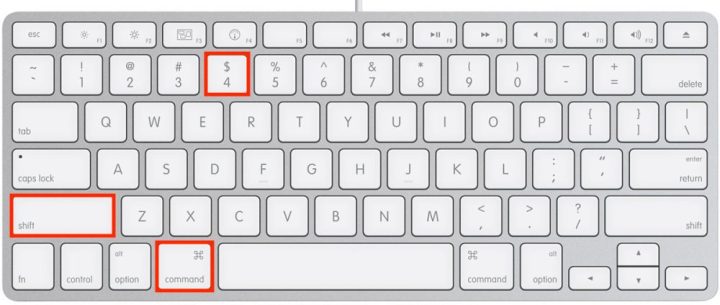
Hold down the keys Shift + Command + 4 at the same time. You'll notice your cursor changing into a crosshair.
Now, click and drag to create a box that covers the area of the screen you want to capture. The dimensions of the box will determine the area of your screenshot.
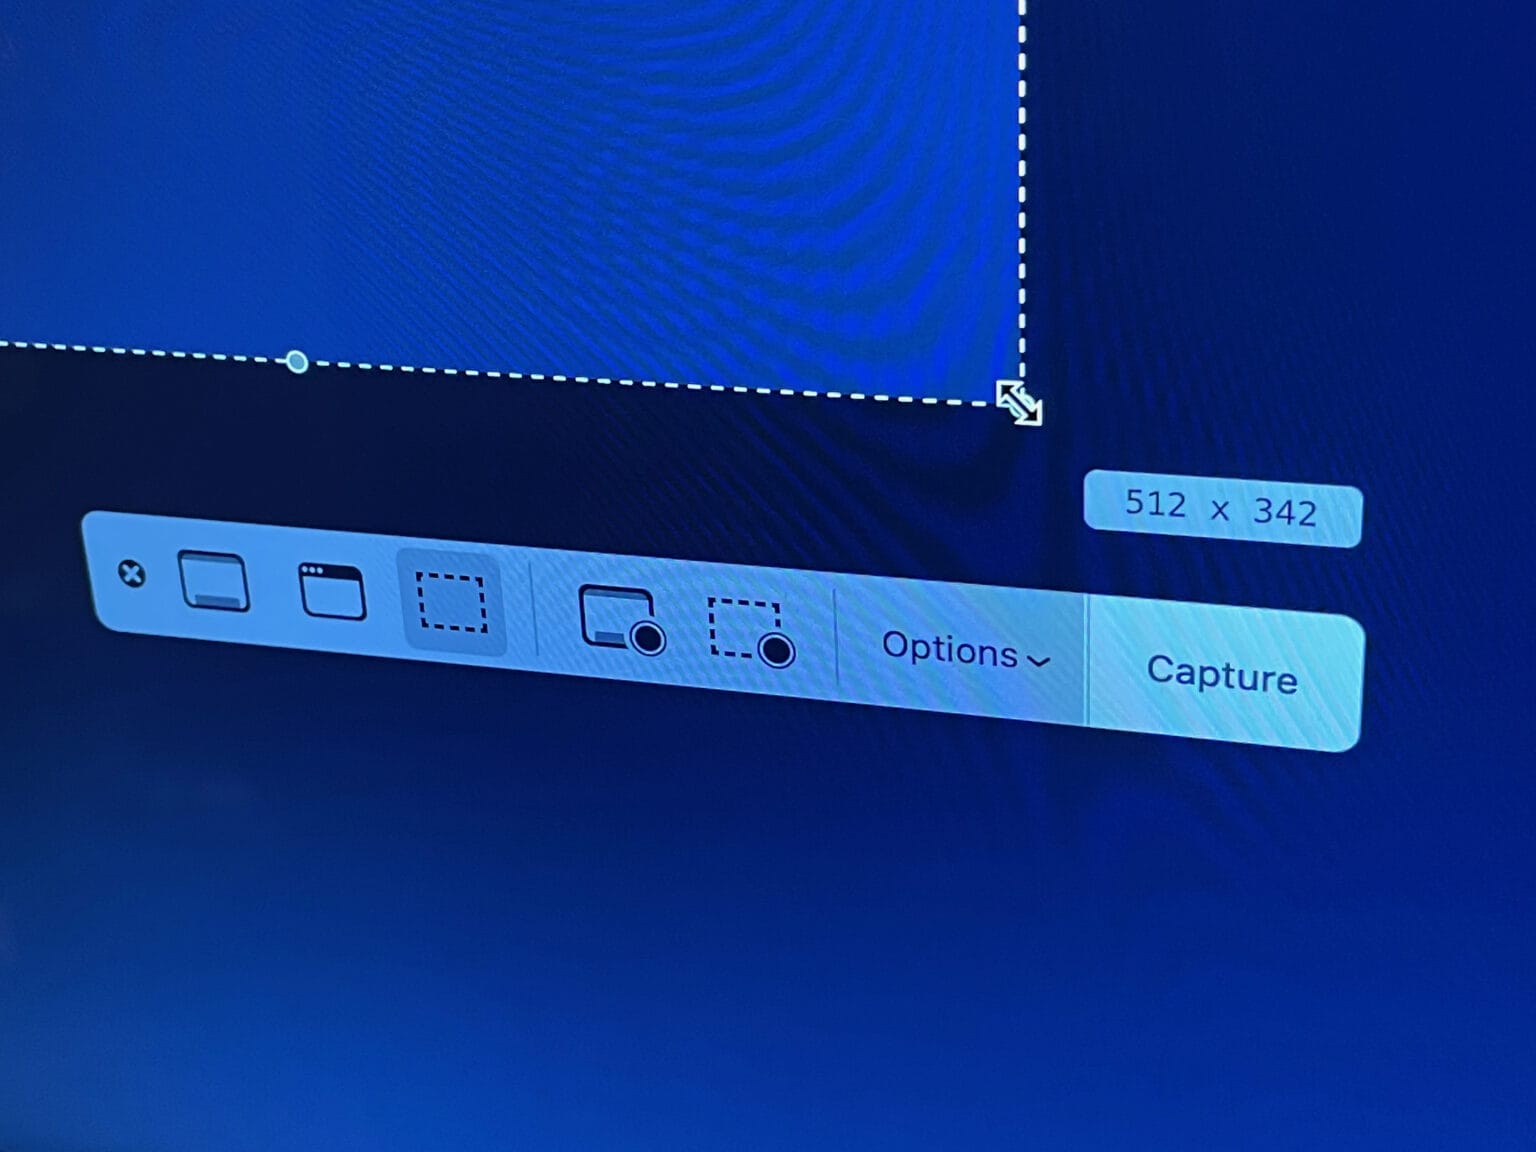
Once you're happy with the selected area, just let go of the mouse button. Or, you can click the "Capture" button. Your screenshot is automatically saved to your desktop.
That's all there is to it! Keyboard shortcuts make cropping screenshots quick and effortless.
Installing third-party apps
Third-party apps for the win.
Other than Mac's built-in tools, plenty of third-party apps are available that can help you crop screenshots in different ways.
Snagit: A powerful and versatile screenshot tool, Snagit lets you take screenshots and crop them with ease. It also features advanced annotation tools for adding highlights, text, and shapes.
Lightshot: This lightweight app lets you capture a specific area of the screen and crop it instantly without any hassle. You can also annotate the screenshot and save it to your computer or share it online.
Greenshot: Ideal for productivity buffs, Greenshot offers quick screenshot cropping and capturing capabilities. It's highly customizable, giving you the freedom to choose where you want your screenshots to go and how they're formatted.
Capto: With Capto, not only can you crop screenshots, but you can also record, edit, and share screen captures. It's perfect for those who need a versatile and full-featured solution for their screen-capturing needs.
These popular alternatives have different features and capabilities. It's worth exploring the options to choose the best app that meets your unique screenshot-cropping needs.
Tips for enhancing screenshot skills
Getting better at screenshot skills on your Mac doesn't have to take up a lot of your time. Here are a few tips that can help enhance your skills:
Use keyboard shortcuts: Familiarize yourself with keyboard shortcuts to capture screenshots quickly. Some shortcuts to know include Shift + Command + 3 for a full screen screenshot and Shift + Command + 4 for a cropped screenshot.
Drag and drop: After taking a screenshot using the built-in Screenshot app, you can drag and drop the thumbnail that appears. This can into a document or an image editing program of your choice. This way, you can crop or edit it further.
Use Preview for annotation: The Preview app is a simple tool to add text, arrows, or shapes to your screenshots.
Practice: The more you use these screenshot methods, the better you'll get. Experiment with different apps and features to see which works best for your workflow.
Find what fits: Don't try to force yourself into a method that doesn't naturally fit into your workflow just because it's the most popular. Experiment and find what personally works best for you.
These simple tips should help you get the most out of screenshot-taking and cropping on your Mac.
Common issues and troubleshooting

No tool is without its issues, and that includes screenshot features on a Mac. Here are some common problems you might encounter and how to fix them:
Screenshot not being saved
If you've taken a screenshot and can't find it on your desktop, check your screenshot settings. Open the Screenshot app (Shift + Command + 5), click on "Options," and under "Save to," check where your screenshots are being saved.
Keyboard shortcuts not working
There could be a few reasons why your keyboard shortcuts aren't working. They could be assigned to other functions, or your keyboard settings might have been altered. Check System Preferences > Keyboard > Shortcuts. This is to make sure that the screenshot shortcuts are correctly assigned.
Can't draw the crop area properly
Trying to select an area for your screenshot and it's not behaving as you'd like? Try starting from the upper left corner and dragging to the lower right corner.
Difficulty cropping in third-party apps
Having trouble cropping screenshots to your liking using third-party apps? Consider referring to their help sections, or get in touch with their customer support for guidance.
As with any tool, getting comfortable with screenshot commands on a Mac might require a bit of troubleshooting. However, with a little patience and the right guidance, you'll be cropping screenshots easily in no time.
Frequently Asked Questions
1. How can I change the format of my screenshots?
The default format for screenshots on Mac is PNG. To change the format, you would have to go into Terminal (found in Applications > Utilities) and use commands.
For example, you can use the command defaults write com.apple.screencapture type jpg and hit Enter to change screenshot format to JPEG. Restart your Mac or enter killall SystemUIServer in the Terminal to make the change effective.
2. Can I capture and crop a screenshot of a specific application window?
Yes, you can. You can use Shift + Command + 4 followed by Space. Your cursor will turn into a camera, and you can click on the window you want to capture. The screenshot will only include the specific window, with a nice drop-shadow border.
3. What is the best way to capture and annotate screenshots?
The best way to capture and annotate screenshots (especially from your screen recordings) on your Mac is to use built-in Screenshot app. Press Shift + Command + 5. Click and drag the area you want to capture.
The screenshot will appear at the corner of your screen. Click on the thumbnail to open it, and you can annotate it using a range of tools: draw, highlight, add shapes or text, rotate, crop, and more. You can save the annotated screenshot directly from there.
4. Which screen capture tool offers the highest resolution?
The native screen capture tool in macOS captures screenshots in high resolution. This helps preserve the quality of the original screen display. If you're looking for third-party tools, Capto and Snagit are renowned for high-resolution screenshots.
They also offer a variety of powerful editing tools.
5. How do I share my screenshots directly from a screenshot tool?
With macOS, once you take a screenshot using Shift + Command + 5 and it appears in the corner of your screen, you can click the thumbnail. This will open your screenshot in the screenshot application which has options to share directly to a number of locations.
This includes Mail, Messages, and more. You can also right-click the screenshot on your desktop, hover over "Share," and choose an option from the context menu.
Conclusion
In conclusion, taking screenshots on a Mac is a simple and fluid process that is easy to master. Whether you're using keyboard shortcuts or third-party tools, snapping the perfect screenshot is just a few keys away. But cropping and editing your screenshots effectively can really take your productivity to the next level.
From shortcuts to terminal settings. From a full-screen capture to an app window selection. Macs provide an array of options to make this process effortless.
Happy screenshotting!
P.S. Want to learn how to crop a video in CapCut? Check out this blog.
Interested in making your screenshot process smoother?
Give Tella.tv a try. It's user-friendly, packed with features, and perfect for producing high-quality, creative screenshots.


